You cannot follow more than 500 characters.An unexpected error has occurred.
Configuration
Configuration
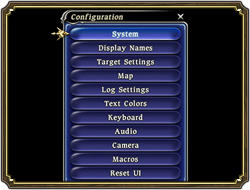
Open main menu » Configuration to access the various in-game settings interface.
It is possible to adjust display and filter settings for chat logs 1 and 2.
|
- System - Name Display - Target Settings - Map - Log Settings - Font Color - Keyboard - Sound - Camera - Macros - Widget Location |
| ※ | To learn more about adjusting screen resolution and other game settings, please see the Play Environment section. |
| Action Bar Display | Toggle action bar display when in passive mode. |
| Toggle Macro Bar | Toggle the continuous display of the macro bar. When the macro bar is hidden, pressing the Ctrl or Alt key (or the gamepad button to which the macro bar has been assigned) displays the macro bar. Pressing the same key again hides it. |
| Action Reselect Cancel | Enable canceling of actions by selecting them again from the action bar while they are being cast or channeled. |
| Damage Display | Toggle the graphical display of damage and status effects. |
| Profanity Filter | Toggle the profanity filter for words appearing in the chat log and other UI elements. |
| Character Shadows | Toggle the display of character shadows.
(Switch off to improve game performance.) |
| Dust Effects | Toggle dust effects made by moving characters.
(Switch off to improve game performance.) |
| Extended Drawing | Toggle the range at which characters are drawn.
(Switch off to improve game performance.) |
| Physics | Toggle realistic physics for the movement of graphical elements such as hair and garments. (Switch off to improve game performance.) |
| Frame Rate Limit | Set the frame rate to 60 fps or 30 fps. (Set to 30 fps to improve game performance.) |
| Names | Toggle the display of all character names. |
| Display Name Position | Set display position for all characters (up or down). |
| Display Names | Display/hide settings for each category. Player: Name/Icon, HP Bar Party Members: Name/Icon, HP Bar Other Players: Name/Icon, HP Bar NPCs: Name/Icon Enemies: Name, HP Bar, Level, Aggression, Enmity |
| Targeting Type | Toggle between targeting modes A, B, and C. | ||||
| Target Cursor Type | Toggle between target cursor types A (central), B (floating), and C (both). | ||||
| Direct Targeting | Toggle the direct targeting feature whereby pressing Confirm selects the closest valid target when none is currently selected. | ||||
| Auto Target Lock | Toggle the auto target lock feature whereby executing an action causes the character to automatically lock on to the target. | ||||
| Target Engaged Enemies | Toggle targeting of engaged enemies only.
When activated, enemies will be targeted in the following manner:
|
||||
| Action Subtargets | Toggle the option to select an alternate target for actions executed directly from the action bar.
* Recommended when playing with a gamepad only (no mouse). |
||||
| Target Highlight | When toggled on, placing the mouse cursor over a character will cause that character to flash. Targeted characters will appear bordered in yellow. | ||||
| Display Name Zoom | When toggled on, placing the mouse cursor over a character will cause that character’s display name to appear enlarged. |
Change map display settings.
| Map Transparency | Drag the slide bar to the right to increase map transparency, and to the left to decrease it. |
| /tell Sound Effect | Toggle the sound effect that plays when receiving a /tell. | ||
| Individual Weaponskill Damage | Toggle the display of individual damage figures in the log for weaponskills that strike multiple times.
|
It is possible to adjust display and filter settings for chat logs 1 and 2.
| Log Display | To display a tab, click on its button and then check Enable Tab.
Please note that the left tab in chat log 1 cannot be disabled.
|
||
| Chat Log Renaming | To rename a chat log, click on its button and then input a new name in the field situated in the upper middle of the display. | ||
| Log Transparency | Drag the slide bar to the right to increase chat log transparency, and to the left to decrease it. | ||
| Text Transparency | Drag the slide bar to the right to increase text transparency, and to the left to decrease it. | ||
| Font Size | Select the font size to display in the log (large, medium, or small). | ||
| Log Auto-hide | Toggle the automatic hiding of the log if inactive for 60 seconds. | ||
| Chat Filters | It is possible to customize the chat filters for each log. Clicking on a chat log button brings up a list of message types, each of which can be set to Show or Hide. |
Customize the font color used to display each message type in the chat log.
| Chat-specific Keyboard | Toggling on removes the need to first press Space when inputting chat, and nullifies the functions mapped to each key. |
| Keyboard Settings | Keyboard controls can be set to either Type A or Type B according to your personal preference. It is also possible to adjust the functions mapped to each key for both keyboard types. Up to two keys can be assigned to a single action. |
| Volume | The volume of the following sounds can be changed. Drag the slide bar all the way left to mute or all the way right to maximize volume.
|
||||||||||
| Audio Distance | Set the position from which sound effects originate in 3-D environments. Sliding the bar to the left to set the source closer to the character, and to the right to set it closer to the screen. | ||||||||||
| Dolby Pro Logic IIz | Toggle Dolby Pro Logic IIz audio features.
* A Dolby Pro Logic IIz device must be connected to your PC.
|
| 1st Person Camera Y-axis | When set to Normal, the 1st Person Camera Y-axis will behave as follows:
Pressing the I key, or the gamepad button set to Move Camera Up, will shift the character’s line of sight upwards. Pressing the K key, or the gamepad button set to Move Camera Up, will shift the character’s line of sight downwards. When set to Inverted, the character’s line of sight will move in the opposite direction. |
| 1st Person Camera X-axis | When set to Normal, the 1st Person Camera X-axis will behave as follows:
Pressing the J key, or the gamepad button set to Move Camera Left, will shift the character’s line of sight to the left. Pressing the L key, or the gamepad button set to Move Camera Right, will shift the character’s line of sight to the right. When set to Inverted, the character’s line of sight will move in the opposite direction. |
| 3rd Person Camera Y-axis | When set to Normal, the 3rd Person Camera Y-axis will behave as follows:
Pressing the I key, or the gamepad button set to Move Camera Up, will move the camera upwards. Pressing the K key, or the gamepad button set to Move Camera Up, will move the camera downwards. When set to Inverted, the camera will move in the opposite direction. |
| 3rd Person Camera X-axis | When set to Normal, the 1st Person Camera X-axis will behave as follows:
Pressing the J key, or the gamepad button set to Move Camera Left, will move the camera to the left. Pressing the L key, or the gamepad button set to Move Camera Right, will move the camera to the right. When set to Inverted, the camera will move in the opposite direction. |
| 3rd Person Camera Field of View | Drag the slide bar to the left to widen the field of vision, and to the right to shrink it. |
| Vertical Camera Position | Drag the slide bar to the left (Up) to increase camera height, and to the right (Down) to decrease it. |
| Camera Speed | Drag the slide bar to the left or right to decrease or increase camera movement speed respectively. |
| Lock-on Camera Range | Drag the slide bar to the left (Narrow) and right (Wide) to set the movement range for the camera during target lock. |
| Event NPC Camera Lock | Toggle the feature whereby the camera centers upon the NPC with whom you are engaged in a conversation. |
| Save Camera Position | Save camera position by pressing Confirm. The camera will default to this position every time you log into FINAL FANTASY XIV. |
| Reset Camera Position | Reset saved camera position to the system default. |
Under this configuration screen, users may create, edit, and delete macros.
To learn more about managing macros, please refer to Text Commands & Macros.
To learn more about managing macros, please refer to Text Commands & Macros.
Selecting Widget Location brings up the option to restore all widgets to their default settings.
© 2010 - 2015 SQUARE ENIX CO., LTD. All Rights Reserved.
FINAL FANTASY, FFXIV, SQUARE ENIX and the SQUARE ENIX logo are registered trademarks or trademarks of Square Enix Holdings Co., Ltd. "PlayStation" and the "PS"
Family logo are registered trademarks and "PS3" is a trademark of Sony Computer Entertainment Inc. The PlayStation Network Logo is a service mark of Sony Computer Entertainment Inc. The ESRB rating icon is a registered trademark of the Entertainment Software Association. All other trademarks are the properties of their respective owners.
 |  |  |  |  |  |