You cannot follow more than 500 characters.An unexpected error has occurred.
 Upon leveling up, you will receive attribute points that can be allotted in order to strengthen your character. To allot your points, open the Point Allotment interface in the main menu.
Disciples of War and Magic will be able to allot points starting from level 10, at which time they will receive five attribute points to spend. Each subsequent gain in level will earn you one additional point. Attribute points can be allotted to your character’s basic parameters, namely Strength, Vitality, Dexterity, Intelligence, Mind, and Piety. Points are spent at a one-to-one ratio, and their issuance and allotment are handled by class.
* Disciples of the Hand & Land are not awarded attribute points.
Please note that a level-determined cap is imposed upon the number of points you can allot to each attribute.
Upon leveling up, you will receive attribute points that can be allotted in order to strengthen your character. To allot your points, open the Point Allotment interface in the main menu.
Disciples of War and Magic will be able to allot points starting from level 10, at which time they will receive five attribute points to spend. Each subsequent gain in level will earn you one additional point. Attribute points can be allotted to your character’s basic parameters, namely Strength, Vitality, Dexterity, Intelligence, Mind, and Piety. Points are spent at a one-to-one ratio, and their issuance and allotment are handled by class.
* Disciples of the Hand & Land are not awarded attribute points.
Please note that a level-determined cap is imposed upon the number of points you can allot to each attribute.
 During party play, spoils received after a battle are distributed randomly to the loot lists of each member.
After a certain period of time, items on a loot list will be automatically moved to a player’s inventory. Should the player’s inventory be full, the items will be lost. Items on a loot list are not considered in a player’s possession until they are added to his/her inventory. Until then, any items, including those which are rare (untradeable) and unique (players can possess no more than one), can be transferred to another party member’s list.
 Upon being revived, players will be temporarily afflicted with “Weakness,” a status which reduces total HP and MP. Those who are further KO’d when under the effect of Weakness and are subsequently revived will be subjected to the “Brink of Death” status, which inflicts additional HP and MP reductions and a host of other negative effects.
The icon for Weakness and Brink of Death appears in the upper portion of the screen, accompanied by the time remaining before the status wears off.
Players can be revived via the following methods, with the subsequent death penalty differing for each.
Battle & Being KO'd
Battle & Being KO'd
The Flow of Battle
| 1. | Ready an arm or tool, changing from passive mode to active mode. By pressing the F key, or the gamepad button set to Passive/Active Mode, a player may toggle between passive mode and active mode. Active mode is easily recognized by a drawn weapon, whether it be the equipped arm of a Disciple of War or Magic, or the throwing stone of a Disciple of the Hand or Land, and a battle-ready stance. | ||
| 2. | Target an enemy.
 Approaching an enemy and pressing the Tab key, or the gamepad button set to Target/Menu Navigation, will cause a targeting cursor to be displayed on that enemy. Approaching an enemy and pressing the Tab key, or the gamepad button set to Target/Menu Navigation, will cause a targeting cursor to be displayed on that enemy.
|
Enemy Strength
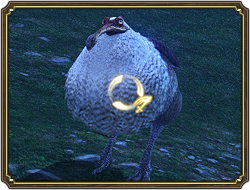
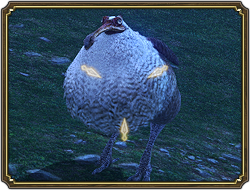
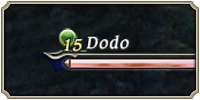 To the left of an enemy’s display name, as well as to the left of the unit frame displayed when targeting an enemy, is a number representing that enemy’s level. By comparing this level with your own or that of other party members, you can get a general sense of the enemy’s strength.
To the left of an enemy’s display name, as well as to the left of the unit frame displayed when targeting an enemy, is a number representing that enemy’s level. By comparing this level with your own or that of other party members, you can get a general sense of the enemy’s strength.
| * | Notorious monsters and other “impossible to gauge” enemies have a ?? in place of a level. |
| 3. | Engage the targeted enemy.
 Pressing the Enter key, or the gamepad button set to Confirm, will cause the targeting cursor to lock on and change shape. Move within striking distance of the target in this state, and you will automatically engage it using melee attacks. This feature, known as auto-attack, is explained in detail further below. If auto-attack can be activated, an icon will appear on the right side of the target parameter interface. After auto-attack has been activated, pressing the Escape key or the gamepad button set to Cancel will interrupt auto-attack and allow you to select a new target. Pressing the Enter key, or the gamepad button set to Confirm, will cause the targeting cursor to lock on and change shape. Move within striking distance of the target in this state, and you will automatically engage it using melee attacks. This feature, known as auto-attack, is explained in detail further below. If auto-attack can be activated, an icon will appear on the right side of the target parameter interface. After auto-attack has been activated, pressing the Escape key or the gamepad button set to Cancel will interrupt auto-attack and allow you to select a new target.
|
| 4. | Battle the enemy using a combination of auto-attack, actions, and abilities.
 The numeric keys 1–0 (not those on the numpad) can be used as shortcut keys to execute the actions and abilities set to the action bar, which is located in the bottom center of the screen. On a gamepad, select the desired action by pressing the buttons set to Target/Menu Navigation (← or →), and then press the Select/Confirm button to execute it.
 Enemies typically cannot be defeated by a single attack. Repeat the above process to gradually deplete an enemy’s HP.
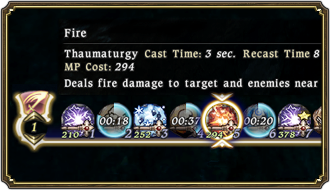
Actions are regulated by recast time. The time remaining before a particular action can be performed again is superimposed over its icon in the action bar. Selecting spells from the action bar will begin the casting process. A cast bar will be displayed, and the cast will be complete when the cast bar reaches the right extremity.
|
Auto-attack
Auto-attack is the feature whereby characters employ melee attacks to automatically strike a target at set intervals. The feature is available to Disciples of War and Magic only (pugilist, gladiator, lancer, archer, thaumaturge, and conjuror), who strike using the weapon equipped in the main hand.
* Archers perform auto-attack with their bare fists.
* Auto-attack interval is determined by the equipped weapon.
* Characters must be facing the target for auto-attack to activate.
* Canceling the targeting cursor interrupts auto-attack.
* Auto-attack interval is determined by the equipped weapon.
* Characters must be facing the target for auto-attack to activate.
* Canceling the targeting cursor interrupts auto-attack.
| 5. | If necessary, position to attack specific body parts, or employ combos. To learn more about incapacitation and combos, please view Effect-inducing Tactics. |
| 6. | Gain victory in battle.
The battle is won when all enemies are slain, at which time experience points are awarded, the amount of which varies with the foe defeated.
|
Recovering HP/MP
Players can recover lost HP and MP through any of the following ways:
| - | Use a text command that restores HP and/or MP. |
| - | Use an item that restores HP and/or MP. |
| - | Rest while in passive mode to restore HP and MP. |
| * | You cannot rest while being attacked. |
| * | You cannot rest while in active mode. |
| 7. | Obtain experience points and items/loot dropped by the enemy.
When a battle has ended, you will earn experience points. You may also obtain items and loot.
|
Entitlement to Experience and Items/Loot
The first character or party to attack an enemy is entitled to its experience, items, and loot. If a player continuously attacks an enemy that another player or party has already claimed, that player will be unable to receive any of the experience, items, or loot.
| * | You are only entitled to experience and loot if an enemy’s display name color is red. For details on display name colors, please refer to The Game Screen. |
| * | Defeating enemies whose levels are lower than yours and your party members’ may result in no experience points being rewarded. |
Enmity
Enmity is the element of the game that governs the target of an enemy’s hostility. Performing certain actions increases an enemy’s enmity towards you; the enemy will attempt to attack the player or NPC who has generated the highest amount of enmity. Skillful control of enmity forms the cornerstone of effective partying.
Enmity is shown via an icon which appears to the left of the enemy’s unit frame. For details, please refer to The Game Screen.
Relationship Between Actions and Enmity Actions that generate enmity can be divided into two main categories: direct and indirect. The former refers to actions that inflict damage or enfeebling status effects upon a foe, while the latter encompasses those that heal or enhance an ally. Different actions will increase enmity to varying extents, with the strength of the delivery (such as damage dealt or HP restored) also playing a part in the calculation. Enmity is reset for players who are KO’d, or who take no action against the enemy for a certain period of time.
Experience Points and Leveling
After achieving victory in battle, you will receive experience points. Once you have received a certain amount of experience points, you will gain a level. Each time you gain a level, your character’s HP and MP will rise, and you will receive attribute points with which to strengthen your character. You will also learn new actions and traits upon attaining certain levels. For information on the different attributes, please refer to Menus.
Actions & Traits
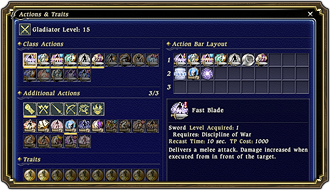
Actions are learned by gaining in level. Upon learning an action for your current class, that action will automatically be set to the action bar.* Traits, once learned, benefit the player constantly and do not need to be set.
 Barring a few exceptions, actions can be used by other classes. A cap is imposed upon the number of actions from other classes that can be set, and is determined by the level of your current class. Traits, however, are class-exclusive.
Barring a few exceptions, actions can be used by other classes. A cap is imposed upon the number of actions from other classes that can be set, and is determined by the level of your current class. Traits, however, are class-exclusive.
| * | Once set to the action bar, actions cannot be voluntarily removed. It is possible, however, to change the order in which they appear. This can be done under Action Bar Layout in the Actions & Traits interface in the main menu.
For details, please refer to Actions, Traits, and Abilities. |
Attribute Points
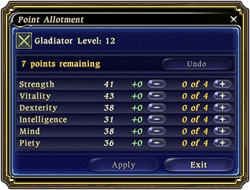
Upon leveling up, you will receive attribute points that can be allotted in order to strengthen your character. To allot your points, open the Point Allotment interface in the main menu.
Disciples of War and Magic will be able to allot points starting from level 10, at which time they will receive five attribute points to spend. Each subsequent gain in level will earn you one additional point. Attribute points can be allotted to your character’s basic parameters, namely Strength, Vitality, Dexterity, Intelligence, Mind, and Piety. Points are spent at a one-to-one ratio, and their issuance and allotment are handled by class.
* Disciples of the Hand & Land are not awarded attribute points.
Please note that a level-determined cap is imposed upon the number of points you can allot to each attribute.
Undoing Point Alottment
Certain job quests award players with a copy of the Keeper’s Hymn, an item used to undo point allotment. To do so, speak with the guild NPC in charge of exchanging guild marks while in possession of the item. You will be given the option to undo point allotment for your current class.
| * | The Keeper’s Hymn is a consumable item. |
The Spoils of War
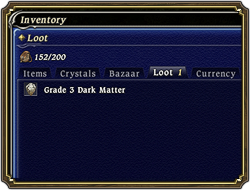
During party play, spoils received after a battle are distributed randomly to the loot lists of each member.
After a certain period of time, items on a loot list will be automatically moved to a player’s inventory. Should the player’s inventory be full, the items will be lost. Items on a loot list are not considered in a player’s possession until they are added to his/her inventory. Until then, any items, including those which are rare (untradeable) and unique (players can possess no more than one), can be transferred to another party member’s list.
| * | Spoils received during solo play go straight into the player's inventory. |
| * | Items obtained from treasure chests may also first find their way to the loot list. |
| * | Items and crystals obtained through gathering will be directly placed in your inventory. |
Should a player’s HP be reduced to 0, that player will be “knocked out.” It is not possible to move or execute actions while under the effect of the KO’d status. A character can be revived by selecting “Return” from the main menu, or by receiving the effects of a Raise spell.
Death Penalty and Raising
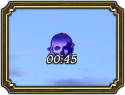
Upon being revived, players will be temporarily afflicted with “Weakness,” a status which reduces total HP and MP. Those who are further KO’d when under the effect of Weakness and are subsequently revived will be subjected to the “Brink of Death” status, which inflicts additional HP and MP reductions and a host of other negative effects.
The icon for Weakness and Brink of Death appears in the upper portion of the screen, accompanied by the time remaining before the status wears off.
Players can be revived via the following methods, with the subsequent death penalty differing for each.
Main Menu » Return
- Revives and warps you to the aetheryte camp or aetherial gate set as your home point.
- Weakness lasts for 3 minutes.
- Equipment durability reduced.
- Weakness lasts for 3 minutes.
- Equipment durability reduced.
| * | If a home point has not been set, using Return will warp you to the last aetheryte camp or aetherial gate selected from the interaction menu. |
Magic
Raise (conjury or items)
- Revives KO’d player on the spot.
- Weakness and Brink of Death effects last for 3 minutes. Players who use the Return command during a regional levequest or behest will be warped to the place where they commenced their objective, while those inside an instanced raid will be returned to the area’s entrance.
© 2010 - 2015 SQUARE ENIX CO., LTD. All Rights Reserved.
FINAL FANTASY, FFXIV, SQUARE ENIX and the SQUARE ENIX logo are registered trademarks or trademarks of Square Enix Holdings Co., Ltd. "PlayStation" and the "PS"
Family logo are registered trademarks and "PS3" is a trademark of Sony Computer Entertainment Inc. The PlayStation Network Logo is a service mark of Sony Computer Entertainment Inc. The ESRB rating icon is a registered trademark of the Entertainment Software Association. All other trademarks are the properties of their respective owners.
 |  |  |  |  |  |